Installing lights on a patio umbrella takes 10 to 30 minutes depending on the light type. Pole clamp lights are the fastest option at under 5 minutes with no tools. String lights umbrella setups take about 20 to 30 minutes with zip ties and patience. Solar panel mounting adds a few extra minutes to position and clip the panel. This is a straightforward project that transforms your outdoor umbrella lighting ideas into something you actually enjoy every evening.
This guide covers how to put lights on umbrella frames of every type so you get it right the first time. Whether you have a standard market umbrella, an offset umbrella, or a cantilever setup, the steps below work with minor adjustments. If you haven’t picked your lights yet, check our best patio umbrella lights guide first.
A few minutes of prep saves you from redoing the install.
Check your umbrella pole diameter. Most pole clamp lights fit 1 to 2 inch poles. Measure yours before buying. If you’re unsure which parts are the ribs versus the stretchers, our parts of a patio umbrella guide has a quick visual.
Count your umbrella ribs. Most patio umbrellas have 6 or 8. String light sets match a specific rib count, so knowing yours prevents ending up with extra strands or not enough coverage.
Decide on your power source. Solar works best in sunny locations without tree cover and requires zero wiring. Battery gives full placement flexibility but you’ll swap batteries every couple of seasons. USB rechargeable models split the difference nicely. Plug in lights are the brightest and most reliable but need a nearby outdoor outlet and an extension cord. Pick based on what your patio actually offers before spending money.
Test your lights before installing. Turn them on and confirm every bulb works. Nothing is worse than zip tying 8 strands to your ribs only to discover dead bulbs.
Gather supplies: zip ties (clear for light canopies, dark for dark ones), small scissors or wire cutters, and a step stool if your umbrella is tall.
Here is a quick comparison so you can see what your LED umbrella light setup requires before starting.
| Light Type | Tools Needed | Installation Time | Difficulty | Works While Umbrella Closes | Notes |
|---|---|---|---|---|---|
| Pole Clamp Light | None | Under 5 minutes | Easy | Yes, stays on pole | Adjust height for spread vs. brightness |
| String Lights (Zip Tie Method) | Zip ties, scissors | 20 to 30 minutes | Moderate | Some models | Most secure attachment method |
| String Lights (Clip Method) | None (clips included) | 15 to 20 minutes | Easy | Usually yes | Faster but less secure in wind |
| Edison Bulb Hanging Lights | Hooks or zip ties | 15 to 25 minutes | Moderate | No, remove first | Check frame handles added weight |
| Solar Panel Mounting | Zip tie or Velcro (optional) | 5 to 10 minutes | Easy | Varies | Position for max sun exposure |
| Plug In With Extension Cord | Cord covers or stakes | 10 to 15 minutes | Easy | Disconnect first | Requires outdoor rated GFCI cord |
This is the simplest umbrella pole light install you can do. Open the umbrella fully. Loosen the clamp mechanism, position the light on the pole at your desired height, and tighten until secure without overtightening (this dents aluminum poles and cracks powder-coated finishes).
Mounting lower puts brighter, focused light on the table. Mounting higher spreads it across a wider area. Start in the middle and adjust after dark. If your model has a rotating head, aim it straight down for dining or angle outward for ambiance.
For offset and cantilever umbrellas where the pole sits to the side, a pole clamp light illuminates the pole area, not your seating area. Use the hook attachment (included with many clamp lights) to hang lights on patio umbrella hubs directly above the table instead.
Time: Under 5 minutes, no tools.
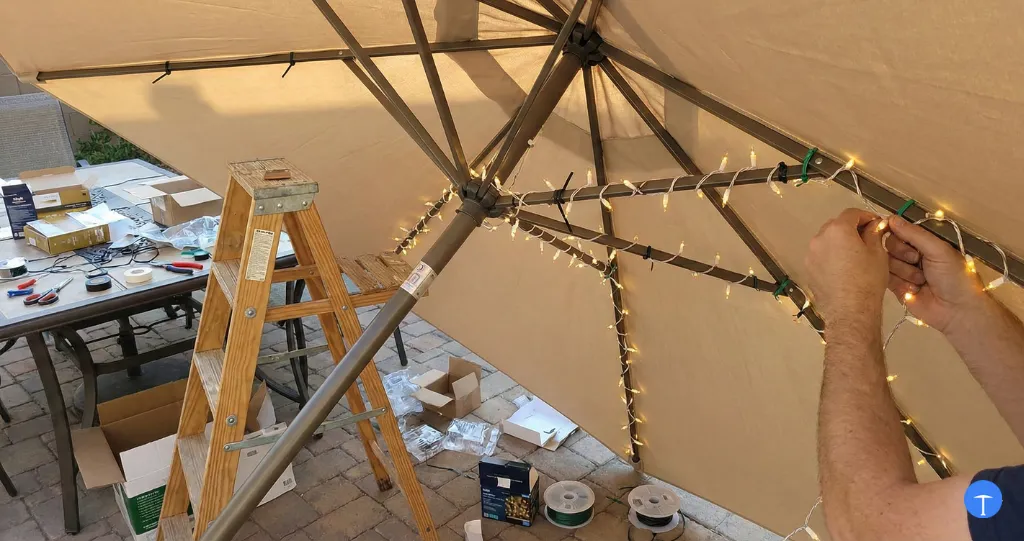
String lights along the ribs give the most even, decorative coverage. The process is the same whether your lights are solar, battery, or USB powered.
The most secure way to attach lights to umbrella ribs, and it holds up best in wind.
Step 1: Open the umbrella fully and lock it in position.
Step 2: Place the battery box umbrella lights unit or solar panel at the top near the hub. This is where your wire starts.
Step 3: Starting at the hub, run one strand along the first rib toward the tip. Let it follow the rib naturally.
Step 4: Zip tie umbrella lights to the rib every 8 to 12 inches. Snip excess tails flush to avoid snags on fabric or fingers.
Step 5: At the rib tip, loop the strand back or tuck the end under the last zip tie.
Step 6: Repeat for all ribs with consistent tension. You want slight slack for natural umbrella movement, not so much that strands droop. If one rib has noticeably more sag than the others, add an extra zip tie at the midpoint.
Step 7: Secure the battery box or solar panel at the top with the included clip. If it feels weak, reinforce with a zip tie. Make sure the unit sits flat and won’t rattle in wind.
Step 8: Route excess wire neatly around the hub, zip tied so nothing dangles. A loose loop of wire flapping in the breeze looks messy and can snag when you open or close the umbrella.
Use clear zip ties on light canopies and dark on dark canopies. Time: 20 to 30 minutes for 8 ribs.
Some sets include clips that snap onto ribs without zip ties. Follow the same rib by rib approach but press the integrated clips on instead. This cuts time to 15 to 20 minutes and makes removal easier.
The tradeoff: when you clip lights to umbrella ribs this way, they’re less secure in wind. Adding one zip tie at the hub end and rib tip of each strand gives backup security without losing clip convenience in the middle.
Getting the solar panel umbrella mount positioned correctly matters as much as the lights themselves. A poorly placed panel means dim output or lights that barely last through the evening. For a deeper look at how solar umbrellas work, we cover the technology separately.
Mount the panel on top of the canopy or on the pole finial, facing upward. Most include a clip for the fabric or finial. If the clip feels weak, reinforce with a zip tie or Velcro strap.
The panel needs direct sunlight during peak hours (roughly 10 AM to 3 PM). Check that trees, rooflines, or the umbrella itself when tilted don’t cast shadows. Even partial shade cuts charging significantly. If your solar lights underperform on overcast days, panel placement is the first thing to check.
Time: 5 to 10 minutes alongside your light installation.
Edison bulbs create a warm, cafe style atmosphere but they’re heavier and hang below the ribs instead of sitting flat.
Step 1: Open the umbrella fully and lock it.
Step 2: Drape the strand from rib to rib in gentle scalloped curves. Don’t pull tight.
Step 3: Secure with hooks, clips, or zip ties at each rib crossing. Firm enough that the strand won’t slide in wind.
Step 4: Confirm bulbs hang evenly and none touch the canopy fabric.
Step 5: Route the power cord down the pole or along one rib.
Check that your umbrella frame handles the added weight without sagging. Lighter aluminum frames sometimes struggle with longer Edison strands. If weight is a concern, built-in LED umbrellas eliminate the issue since the lights are integrated into the frame.
Time: 15 to 25 minutes.
This is where most install patio umbrella lights projects go from clean to messy. Good cord management umbrella technique makes the difference.
Route cords along the pole using spiral cord wrap or zip ties every 6 to 8 inches. Keep cords at least 3 inches from the crank mechanism and tilt joint. Cords routed near the crank get caught on the first rotation, damaging the cord and potentially jamming the mechanism. This is the single most common complaint with aftermarket umbrella lights, and it’s completely avoidable with proper routing.
For plug in lights, use an outdoor rated extension cord with GFCI protection. Indoor cords aren’t built for moisture and are a genuine safety hazard outdoors. Secure ground level cords with cord covers or landscape stakes to prevent tripping. Run the cord along the edge of the patio rather than across walkways.
Mount battery boxes so they’re accessible for changes without disassembling the lights. One easily removable zip tie beats three permanent ones. Think about how you’ll access it in a few months when the batteries start losing charge.
Every method works exactly as described on a standard market umbrella. No adjustments needed. These are the easiest to add lights to because the pole sits directly above the table.
Offset umbrellas and cantilever models position the pole to the side, changing how pole clamp lights work. The clamp illuminates the pole area, not your seating. Use rib-mounted string lights instead, or hang a clamp light from the hub using the hook attachment.
Route cords along the offset arm with zip ties the same way you would along a center pole. String lights along the ribs work identically regardless of pole position.
Attaching lights before testing them. A dead strand discovered after installation means double the work. Always test first.
Using too few zip ties. Spacing beyond 12 inches lets strands sag. Umbrella lights falling off or drooping is the number one complaint, and it’s almost always insufficient attachment points.
Pulling string lights too tight. Strands need slack for umbrella lights wind movement, tilting, and opening and closing. Tight strands stress wiring until connections break.
Routing cords through the crank mechanism. Gets caught on the first rotation and damages both cord and crank. Leave 3 inches of clearance from any moving parts.
Forgetting solar panel placement. A shaded panel barely charges. Check placement during actual peak sun, not just at installation time.
Using indoor extension cords outdoors. Not built for moisture. Use outdoor rated GFCI cords every time. This is a safety issue.
Overtightening pole clamps. Snug, not maximum force. Overtightening dents aluminum and cracks finishes.
Pole clamp lights stay on the pole and don’t interfere with closing. String lights with zip ties usually fold with the umbrella, though some models need occasional readjustment. Edison bulb hanging lights should be removed before closing because their weight stresses the ribs and canopy.
Yes. String lights along the ribs work exactly the same on offset and cantilever umbrellas. Pole clamp lights illuminate the pole side rather than the seating area, so use the hub hook attachment to hang the light from the center of the canopy instead.
Route cords along the pole with spiral cord wrap or zip ties every 6 to 8 inches. For ground level cords, use flat cord covers or landscape stakes. Choosing a cord color that matches your pole or patio helps everything disappear.
Not when used correctly. Attach them to the ribs, not the fabric. Snip tails flush so no sharp edges snag the canopy. Replace them each season since UV exposure makes them brittle.
Most patio umbrella lights handle rain fine. Check packaging for an IP44 or higher rating, which means protection against splashing water. Make sure battery compartment doors and USB covers are sealed before storms. Plug in connections are most vulnerable, which is why outdoor GFCI cords are essential.
Getting the lights installed is the main event, but seasonal maintenance keeps them working for years instead of one summer. Remove or store patio umbrella lights before winter. Extended exposure to freezing temperatures and ice degrades wiring and battery components faster than regular outdoor use. Check zip ties each spring since UV makes them brittle and prone to snapping without warning. A five minute inspection prevents your lights from falling mid dinner. Clean solar panels monthly with a damp cloth to maintain charging efficiency. Dust, pollen, and bird droppings build up quickly and reduce output more than most people expect. Replace rechargeable batteries every 2 to 3 seasons when run time drops noticeably.
Once your patio umbrella light setup is done and cords are managed, all that’s left is sundown. If you’re still exploring options, browse our full roundup of the best LED patio umbrellas for models with lights already built in.